
Js的事件循环系统是啥?
单线程就意味着,所有任务需要排队,前一个任务结束,才会执行后一个任务。如果前一个任务耗时很长,后一个任务就不得不一直等着,js是如何解决这个问题的呢?
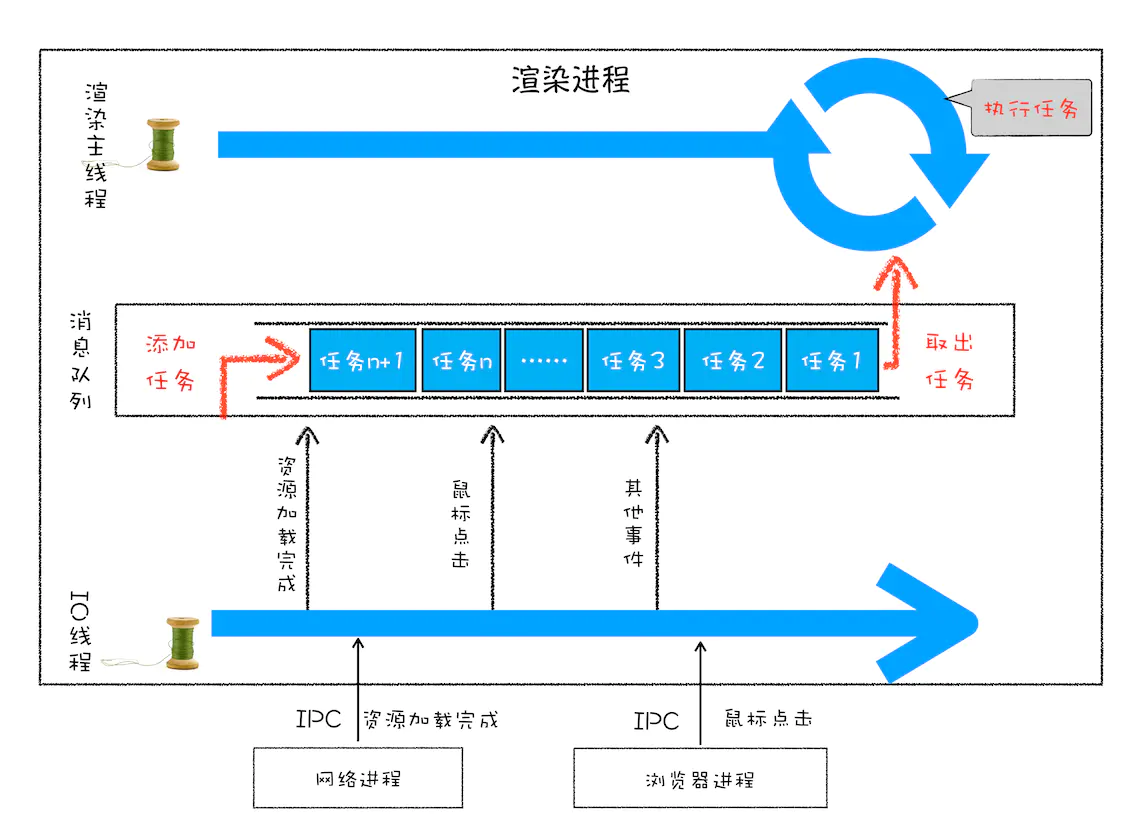
我们都知道每个渲染进程都有一个主线程,并且主线程非常繁忙,既要处理 DOM,又要计算样式,还要处理布局,同时还需要处理 JavaScript 任务以及各种输入事件。要让这么多不同类型的任务在主线程中有条不紊地执行,这就需要一个系统来统筹调度这些任务,这个统筹调度系统就是 消息队列 和 事件循环 系统
一、任务队列
单线程就意味着,所有任务需要排队,前一个任务结束,才会执行后一个任务。如果前一个任务耗时很长,后一个任务就不得不一直等着。
如果排队是因为计算量大,CPU忙不过来,倒也算了,但是很多时候CPU是闲着的,因为IO设备(输入输出设备)很慢(比如Ajax操作从网络读取数据),不得不等着结果出来,再往下执行。
JavaScript语言的设计者意识到,这时主线程完全可以不管IO设备,挂起处于等待中的任务,先运行排在后面的任务。等到IO设备返回了结果,再回过头,把挂起的任务继续执行下去。
于是,所有任务可以分成两种,一种是同步任务(synchronous),另一种是异步任务(asynchronous)。同步任务指的是,在主线程上排队执行的任务,只有前一个任务执行完毕,才能执行后一个任务;异步任务指的是,不进入主线程、而进入"任务队列"(task queue)的任务,只有"任务队列"通知主线程,某个异步任务可以执行了,该任务才会进入主线程执行。
具体来说,异步执行的运行机制如下。(同步执行也是如此,因为它可以被视为没有异步任务的异步执行。)
(1)所有同步任务都在主线程上执行,形成一个执行栈(execution context stack)。 (2)主线程之外,还存在一个"任务队列"(task queue)。只要异步任务有了运行结果,就在"任务队列"之中放置一个事件。 (3)一旦"执行栈"中的所有同步任务执行完毕,系统就会读取"任务队列",看看里面有哪些事件。那些对应的异步任务,于是结束等待状态,进入执行栈,开始执行。 (4)主线程不断重复上面的第三步。
二、事件和回调函数
"任务队列"是一个事件的队列(也可以理解成消息的队列),IO设备完成一项任务,就在"任务队列"中添加一个事件,表示相关的异步任务可以进入"执行栈"了。主线程读取"任务队列",就是读取里面有哪些事件。
"任务队列"中的事件,除了IO设备的事件以外,还包括一些用户产生的事件(比如鼠标点击、页面滚动等等)。只要指定过回调函数,这些事件发生时就会进入"任务队列",等待主线程读取。
所谓"回调函数"(callback),就是那些会被主线程挂起来的代码。异步任务必须指定回调函数,当主线程开始执行异步任务,就是执行对应的回调函数。
"任务队列"是一个先进先出的数据结构,排在前面的事件,优先被主线程读取。主线程的读取过程基本上是自动的,只要执行栈一清空,"任务队列"上第一位的事件就自动进入主线程。但是,由于存在后文提到的"定时器"功能,主线程首先要检查一下执行时间,某些事件只有到了规定的时间,才能返回主线程。
三、Event Loop
主线程从"任务队列"中读取事件,这个过程是循环不断的,所以整个的这种运行机制又称为Event Loop(事件循环)。
为了更好地理解Event Loop,请看下图(转引自Philip Roberts的演讲《Help, I'm stuck in an event-loop》)。
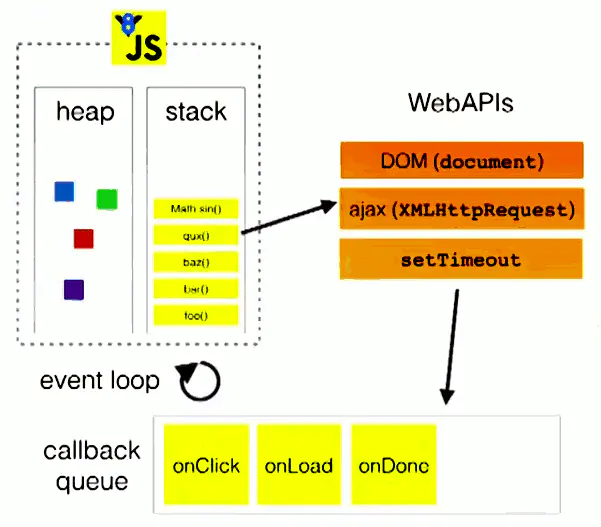 上图中,主线程运行的时候,产生堆(heap)和栈(stack),栈中的代码调用各种外部API,它们在"任务队列"中加入各种事件(click,load,done)。只要栈中的代码执行完毕,主线程就会去读取"任务队列",依次执行那些事件所对应的回调函数。
执行栈中的代码(同步任务),总是在读取"任务队列"(异步任务)之前执行。
四、定时器
除了放置异步任务的事件,"任务队列"还可以放置定时事件,即指定某些代码在多少时间之后执行。这叫做"定时器"(timer)功能,也就是定时执行的代码。
定时器功能主要由setTimeout()和setInterval()这两个函数来完成,它们的内部运行机制完全一样,区别在于前者指定的代码是一次性执行,后者则为反复执行。以下主要讨论setTimeout()。
已複製!console.log(1);
setTimeout(function () {
  console.log(2);
}, 1000);
console.log(3);
上面代码的执行结果是1,3,2,因为setTimeout()将第二行推迟到1000毫秒之后执行。
如果将setTimeout()的第二个参数设为0,就表示当前代码执行完(执行栈清空)以后,立即执行(0毫秒间隔)指定的回调函数。
已複製!setTimeout(function () {
  console.log(1);
}, 0);
console.log(2);
上面代码的执行结果总是2,1,因为只有在执行完第二行以后,系统才会去执行"任务队列"中的回调函数。
总之,setTimeout(fn,0)的含义是,指定某个任务在主线程最早可得的空闲时间执行,也就是说,尽可能早得执行。它在"任务队列"的尾部添加一个事件,因此要等到同步任务和"任务队列"现有的事件都处理完,才会得到执行。
HTML5标准规定了setTimeout()的第二个参数的最小值(最短间隔),不得低于4毫秒,如果低于这个值,就会自动增加。在此之前,老版本的浏览器都将最短间隔设为10毫秒。另外,对于那些DOM的变动(尤其是涉及页面重新渲染的部分),通常不会立即执行,而是每16毫秒执行一次。这时使用requestAnimationFrame()的效果要好于setTimeout()。
需要注意的是,setTimeout()只是将事件插入了"任务队列",必须等到当前代码(执行栈)执行完,主线程才会去执行它指定的回调函数。要是当前代码耗时很长,有可能要等很久,所以并没有办法保证,回调函数一定会在setTimeout()指定的时间执行。
🤔思考:消息队列中的任务都是一样的吗?